Eleven Rules for Engaging Students' Brains


I am not a scientist.  I'm a regular teacher who does regular teacher-y things.  Like taking classes to learn to be a better teacher, and reading articles, books and blogs. 

 The only thing that I am an expert on is what works in my own classroom.  That's it.  I've spent years figuring this out.  No one knows this better than I do.  This is because:

I have made it my goal to try to teach 
the way kids learn. 

This means taking the time to figure our how their brains work!  So here is my list of 11 Rules for Engaging Students' Brains.  I'm printing it out and keeping it close while I teach, because I need constant reminding!
(That's the way MY brain works.) 
I hope it can help you, as well.  
Light Bulbs and Laughter - Eleven Rules for Engaging Students' Brains
 You can download these FREE posters 
from TpT by clicking HERE.
Light Bulbs and Laughter - Eleven Rules for Engaging Students' Brains

Light Bulbs and Laughter - Eleven Rules for Engaging Students' Brains


Happy Teaching,


This Video Changed the Way I Teach Writing


 Gestures will change the way you teach.

 These second grade teachers (whom I have never met) are practicing a Whole Brain Teaching technique called Air Punctuation.  It is one part of something called "Oral Writing."  Chris Biffle explains this much better than I can on his Whole Brain Teaching website.  To learn more, you will need to sign in and then watch Professional Development Video #502. (Watch out, it's an hour long!)

These teachers cover capitals, commas, periods, exclamation marks, quotes, question marks, and "for example".  This is just the beginning!  There are also gestures for conjunctions, complete sentences, "adder" sentences and "concluders," which teach students to talk in paragraphs.

My all time favorite gesture, however, (that is not in the video) is the because clapper.  One of the shifts in the Common Core Standards is a focus on text based evidence.  When a student answers a question, have them say "because," and clap their hands once.  This indicates that they will be following up with evidence.  (For example: "I know it is time for lunch because the clock says 11:45" or "I think Chrysanthemum feels sad because the author says she wilted on this page.")

Students need to practice using gestures.  Not just a few times.  Hundreds of times!  The student who goes to the front of the class each morning to say the date, and what's for lunch?  Have him use gestures while he talks.  And have the rest of the class silently mirror his gestures.  This means they're paying attention!  Use gestures during small groups.  Use them whole class.  Give lavish praise to students who remember them.  Take advantage of the fact that most kiddos love to talk!

The next step is to have students write what they've said.  You will be amazed.  They will remember the comma (zoop), and period  (errrr).  They will capitalize the first word of sentences, and remember to use question marks.  Well, let's be honest.  They won't remember every time.  But you can remind them with a silent gesture and a smile.  How great is that?


And there you have it.  My teaching is forever changed, and I'm having so much fun!

Happy Teaching with Gestures,


Mixing Up My Ingredients For Teaching

I love to bake.  Cooking, not so much.  Give me a recipe for homemade bread, zweibach, or cobbler, or some amazing cookies, and I'm there.  I am very methodical in the kitchen - I get out all the ingredients first, and clean up as I go (this drives my husband crazy, by the way).  I have a method.

Today I'm linking up with Miss DeCarbo from her Sugar and Spice Blog.  She's asking the question, "What are your teaching ingredients?"  I had never thought about it in quite that way.  Here's what I came up with.
Light Bulbs and Laughter - My Ingredients for Teaching

Now that I made this... I realize that I could have added so many more ingredients!  What are your ingredients for teaching?  Do they look anything like mine?  Link up here to let me know!

http://secondgradesugarandspice.blogspot.com/2014/07/what-are-your-teaching-ingredients.html

Happy Teaching,

Why I Love Common Core Math - Eight Standards for Mathematical Practice, part 3

I can't seem to stop writing about this subject.  If you've read part 1 and part 2, thanks for sticking with me.  This is the last one, I promise!  At least until school starts and I can tell you how it's going. =)

The final part of this project is to come up with gestures to go along with these practice standards.  If you know anything about Whole Brain Teaching, you know that we recite our class rules every morning, standing up, with Big Gestures.  We can get pretty silly with this and use different voices, as well.  I particularly like the Big Bad Giant voice, but  the Squeaky Mouse Voice is fun, too. (I am very willing to act silly for the sake of learning.  I firmly believe that elementary teachers have to leave their dignity at the classroom door.  We can always put it on again when we leave!)

So, let's see how this gesture stuff could transfer over to our 8 Math Practice Standards.  Here is my Kindergarten standards set that goes on the wall/whiteboard.  I'll tell you the gestures that I'm thinking of, and I'd love to hear your opinions.  Since it's summer, I can't walk next door and talk to my teaching partner (Hi, Kate!), so I need your help.  Here we go.


Light Bulbs and Laughter - Eight Standards for Mathematical Practice, Part 3

 "Math Practice 1, Keep Trying!"
 Gesture: Hold up one finger, then pretend you are walking up hill.  Swing your arms really high.

"Math Practice 2, Think About Math!"
Gesture: Hold up two fingers, then point at your brain with your index finger, touching your head three times.

"Math Practice 3, Talk About Math!"
Gesture: Hold up three finders, then open and close your hand to look as though it is talking.

 "Math Practice 4, Model Math!"

Gesture: Hold up four fingers, then move hands one on top of the other, as though putting together linker cubes.

"Math Practice 5, Use Math Tools!"
Gesture: Hold up five fingers, then act as though you are holding a nail with one hand, and pounding it with a hammer."

"Math Practice 6, Check Your Work!"
Gesture: Hold up six fingers, then pretend you are holding a magnifying glass to your eye."

"Math Practice 7, Look For Patterns!"
Gesture: Hold up seven fingers, then make circles with your thumbs and forefingers and put them in front of your eyes as though they were glasses.

"Math Practice 8, Look For Shortcuts!"
Gesture: Hold up eight fingers, then act as though you are holding a small stick in both hands and breaking it in the middle, then putting it back together.

Well, what do you think?  I am open to ideas for making this better!  Please let me know in the comments.  If you like what you see, please check out the rest of the download at my TpT store, Light Bulbs and Laughter.  It includes eight cards for the students to put on a ring, and a one-page list as well.

In my next post, you will see why I believe gestures are important, and see the video that changed the way I teach!

Happy Teaching,


Why I Love Common Core Math - Eight Standards For Mathematical Practice, Part 2

Light Bulbs and Laughter - Eight Standards for Mathematical Practice, Part 2
In my last post, I discussed how I use these Math Practice Standards when I begin to teach a new math standard or unit.  You can find that post HERE.  It's a fabulous way to activate prior knowledge and check for understanding.


Now, let's talk about sunglasses.  Third graders love them.  They also love the idea of magic.  So if we put on our magic mathematical glasses to look at something, we see things differently.  We FOCUS on a particular math practice.  How fun is that?

Since I'm all about having fun while we learn, I'm now on the lookout for some colorful, inexpensive sunglasses to use with next year's students.  (If you know a good place to find them, please let me know in the comments!)

So, let's step back in time to the beginning of last year.  I found the 8 Standards for Mathematical Practice at the CCSS website.  I typed them up and put them vertically on the whiteboard that I use to teach math.

And they sat there.  I did nothing with them.  They did not engage me.  They did not engage the students.  In fact, in six months, not one student asked me what they were or what they meant.  And they were right in front of us!!

Around January, I was talking to a math specialist at our County Office of Education (Hi, Kim!), and she made me realize how important they are.  I went back to my classroom, determined to make them work.

But here's the problem: young children don't understand the words!  I then set out to adapt them.  I worked with the K - 3 teachers at my school, asking for input and getting feedback.  After several months and what felt like fifty different tries (but was probably only around twelve), I was ready to visit Kim and her cohort Tracey.  These math specialists gave me more to think about, and helped me dig deep into what the standards really mean for children.  More changes were made.

And that is how these particular Adapted Standards for Mathematical Practice came to be.  I used clip art that matches the standard and the age group, since these are available for Kindergarten, Grades 1-2, Grades 3-5, and Grades 6-8. 

These will be in every classroom in my K-8 school on the first day of the new school year.  Beginning in Kindergarten, I hope to encourage every teacher to say these words with their students as they begin their math lesson for the day.  (And in a nod to Whole Brain Teaching, I am working on gestures to go with each, so that students can engage all parts of their brain as they learn them!)

Beyond the posters for the wall or whiteboard, I have also made a one-page list for each grade level, and cards that can be cut out and put on a ring for each student to keep in their desks.  If you would like to see these, please check them out in my Teachers Pay Teachers store Light Bulbs and Laughter.

In conclusion, I have a question for you!  I believe that every math lesson will include a few of these practices.  Maybe there are lessons that include them all.  (Not introductory lessons, but the regular, every day kind.)  I have been told in math training that Number Talks are the only type of lessons that include every one of these.  Do you agree?  Have you ever used every one of these practices when teaching a lesson?

Happy Math Teaching,


Why I Love Common Core Math - Eight Standards for Mathematical Practice, Part 1

Light Bulbs and Laughter - Eight Standards for Mathematical Practice, Part 1
The Common Core Standards.  Some people love them.  Some people hate them.  Most people have an opinion, and much that is said (just look at your facebook feed!) is not based on anything but heresay.

Well, here's what I have to say about Common Core Math.  Regardless of what grade you teach, from K-12, and regardless of the particular math standard that you are teaching at a given time, the Common Core has given us eight Mathematical Practice Standards that are awesome.  Yep.  I said awesome.  Here's why.  They're like sunglasses.
You put them on, and you look at a standard in a different way.  Your perspective changes, and you see it in a whole new light (dark?).  And when you look at anything in EIGHT different ways, well, you're bound to understand it better.

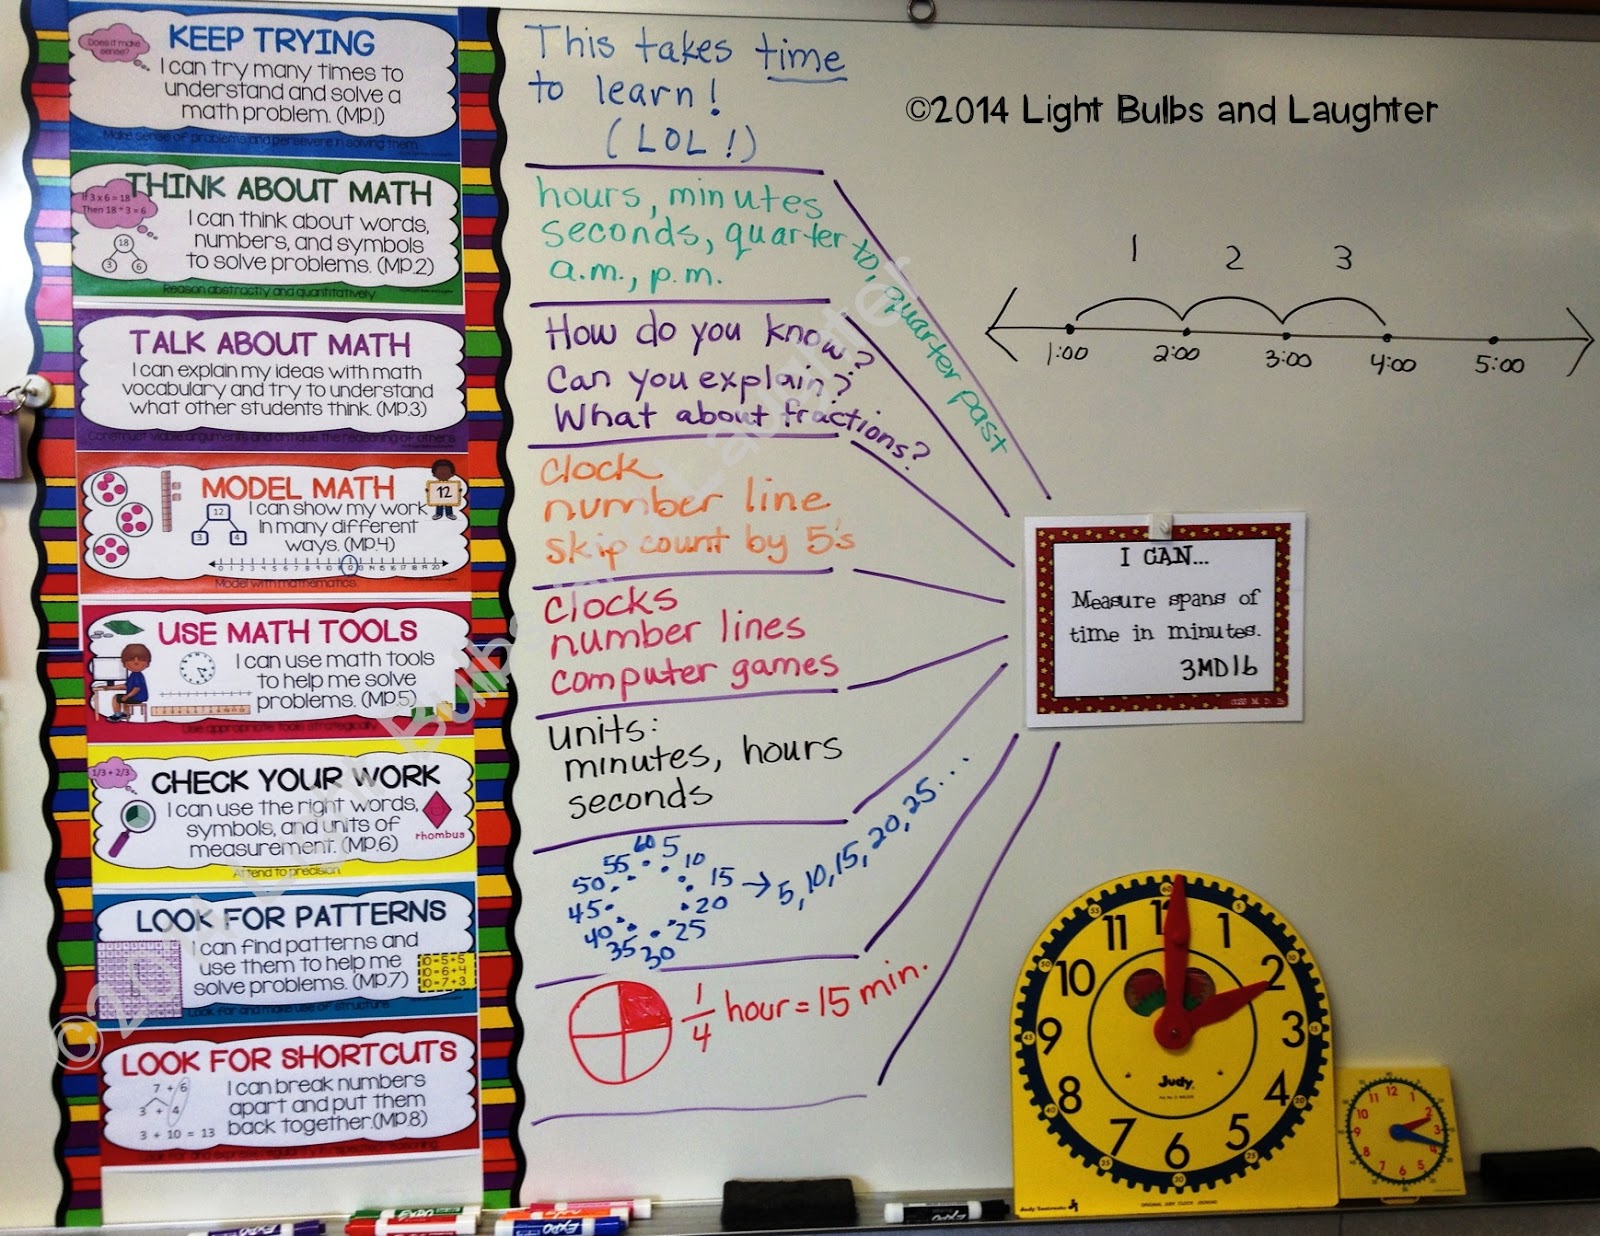
Let's look at the photo above.  I was introducing the standard of measuring time in minutes to my third graders.  They had already learned about telling time to the hour and half hour in first grade, and to five minutes in second grade, so it was definitely not a new concept for these students.

So we began looking at the standard through our special "lenses":

MP1: Keep Trying.  We asked ourselves, "What does it mean to keep trying?"  One of my sweeties pointed out that it takes TIME to learn something new (I know, right?  Pretty good sense of humor for an eight-year-old.)  So that's what we wrote down.

MP2: Think About Math.  "What are the words, numbers, and symbols we think about with this standard?"  The students came up with these: hours, minutes, seconds, a.m., p.m., quarter to, and quarter past.

MP3: Talk About Math.  "What do we say to each other when we talk about this standard?"  The students said that they would ask, "How do you know?", "Can you explain that?".  The question, "What about fractions?" was added later, after discussing MP8.

MP4: Model Math.  "What do we use to model this standard?"  The answers were a clock, a number line, and skip counting by fives.

MP5: Use Math Tools.  "What tools would we use to solve problems with this standard?"  The answers were clocks (I had the student get them and put them on the white board tray), number lines (the student told me how to draw one), and computer games.

MP6: Check Your Work.  This means, "Are we using the right words, symbols, and units of measurement?"  The students pointed out that the units of measurement for this standard would be minutes, hours, and seconds.

MP7: Look for Patterns.  "What patterns can we find to help us solve problems?"  The students immediately pointed out the pattern of counting by fives.  They wanted the pattern to go in a circle, like the clock, but said that it could also be written out on a number line.

MP8: Look for Shortcuts.  The question for this one is, "How can we break things apart and put them back together?"  I didn't know what I was going to get on this one!  First, a student said that you could break the clock in half, and that would be 30 minutes.  Then another student said that you could break the half a clock in half again.  I drew that on the whiteboard and asked what it looked like to them, and one student said, "fractions!"  So we talked about how one-fourth of an hour would be 15 minutes.

And there you have it.  In less than thirty minutes, we had a collaborative introduction to a standard that was very thorough, activated our background knowledge, and that we could refer back to (and add to) as we progressed through the unit.  Plus, it was a lot more fun than a written assessment!

I'm sure you noticed that these Eight Standards for Mathematical Practice have been modified.  I felt that the original wording was too difficult for young children to understand, and that my time was better spent teaching the math, instead of teaching them the meaning of words like "precision" and  "abstractly" and "quantitatively".

I'll tell you more about the modification process, and about how we use them at our K-8 school in my next post!

UPDATE #1:  I've been asked to place the links to my products on TeachersPayTeachers on this post.  Before I do, I want to say that you don't NEED a particular set to do this type of introductory lesson!  There are free sets out there, or you can make your own.  That being said, here are the links to purchase mine (and of course I would be thrilled if you do!).
Kindergarten 8MPS
Grades 1-2 8MPS
Grades 3-5 8MPS
Grades 6-8 8MPS   (These are more "grown up" - original wording, no clipart, no cards.)
Remember to print them ledger size to fit perfectly on a white board!!
UPDATE #2: The magnetic strips that I used  on the whiteboard to hold the standards up... I bought them at a local teacher store.  They are available (as well as lots of other cute styles) on Amazon  HERE.

Happy Teaching,


How To Make Your Binders Beautiful - For Free

It's time to make our binders beautiful, people!  This pink and black polka-dot set is my first one, and it is free on Teachers Pay Teachers.  You can get it at my store, appropriately called... Light Bulbs and Laughter.  Yep.  You will need to have PowerPoint to open the file.  Here is what you will see:
       
Light Bulbs and Laughter - How to Make Your Binders Beautiful, For Free
 Page 1
 
This cover page.  These pink and black covers are for my dear teacher friend Yolie.  She is a fierce and feisty defender and teacher of children, and she loves pink and black (and Betty Boop, but that's another story).

Light Bulbs and Laughter - How to Make Your Binders Beautiful, For Free
Light Bulbs and Laughter - How to Make Your Binders Beautiful, For Free(Click on any picture to 
make it full sized.)
 
 
 Page 2
 
 An explanation of why we need those binders beautified.  Those white borders mustbebanished.  At least on the bigger binders.


  Page 3

Detailed instructions.  Some of you won't need them at all. Some of you may.  I just wanted an excuse to make really big polka-dots!
 

Light Bulbs and Laughter - How to Make Your Binders Beautiful, For FreePage 4 & 5
 
Two choices of covers, with and without the black rectangle thingy at the bottom.  Some
people like to put their name there, some prefer their cover without it. 
 
The text boxes will be there, waiting for you.  Download the gorgeous cursive font that I suggested, HERE (it's free for personal use), or any old one your heart desires.
Light Bulbs and Laughter - How to Make Your Binders Beautiful, For FreeFIVE choices of spine sizes.  
 
Page 6
 This first one has cut lines that are perfect for my bazillion two-inch binders.  However,  the spine width is 2 1/4 inches.   It can 
be cut slightly smaller, 
or bigger by 1/4 inch on each side if you have those huge
 3-inch binders to beautify.
 
Light Bulbs and Laughter - How to Make Your Binders Beautiful, For Free


Page 7

The second spine page is for binders that have a 1 3/4 inch wide spine.


Light Bulbs and Laughter - How to Make Your Binders Beautiful, For Free


Page 8

The third spine page is for binders with a 1 1/2ish spine.


Light Bulbs and Laughter - How to Make Your Binders Beautiful, For Free

Page 9

I know, this is getting boring.  Hang in there just a little longer!

This fourth spine page is for one inch binders.  It measures 7/8 of an inch wide.


Light Bulbs and Laughter - How to Make Your Binders Beautiful, For Free


Page 10

This is for those tiny little half inch binders.  They don't hold enough to be worth much.  But I have a few.
Light Bulbs and Laughter - How to Make Your Binders Beautiful, For Free
                 Page 11

This guy is for the BACK of your binder.  I know.  Most people wouldn't even think of putting a back on.  But someone requested it, and it does make
the binder look really professional...

You can also use it to make a different spine or cover.  Just add your own black
shape and type away!


Whew.  If you made it all the way to the bottom of this post, you deserve a prize.  So go and download these binder covers.  If pink and black are not your thing, I have some others on their way to TpT very soon.  Remember to leave feedback, and follow my store for more polka-dot happiness, and other stuff, too.

Thanks for beautifying your binders with me,