In my last post, I discussed how I use these Math Practice Standards when
I begin to teach a new math standard or unit. You can find that post HERE. It's a fabulous way to activate prior knowledge and check for understanding.
Now, let's talk about sunglasses. Third graders love them. They also love the idea of magic. So if we put on our magic mathematical glasses to look at something, we see things differently. We FOCUS on a particular math practice. How fun is that?
Since I'm all about having fun while we learn, I'm now on the lookout for some colorful, inexpensive sunglasses to use with next year's students. (If you know a good place to find them, please let me know in the comments!)
So, let's step back in time to the beginning of last year. I found the 8 Standards for Mathematical Practice at the CCSS website. I typed them up and put them vertically on the whiteboard that I use to teach math.
And they sat there. I did nothing with them. They did not engage me. They did not engage the students. In fact, in six months, not one student asked me what they were or what they meant. And they were right in front of us!!
Around January, I was talking to a math specialist at our County Office of Education (Hi, Kim!), and she made me realize how important they are. I went back to my classroom, determined to make them work.
But here's the problem: young children don't understand the words! I then set out to adapt them. I worked with the K - 3 teachers at my school, asking for input and getting feedback. After several months and what felt like fifty different tries (but was probably only around twelve), I was ready to visit Kim and her cohort Tracey. These math specialists gave me more to think about, and helped me dig deep into what the standards really mean for children. More changes were made.
And that is how these particular Adapted Standards for Mathematical Practice came to be. I used clip art that matches the standard and the age group, since these are available for Kindergarten, Grades 1-2, Grades 3-5, and Grades 6-8.
These will be in every classroom in my K-8 school on the first day of the new school year. Beginning in Kindergarten, I hope to encourage every teacher to say these words with their students as they begin their math lesson for the day. (And in a nod to Whole Brain Teaching, I am working on gestures to go with each, so that students can engage all parts of their brain as they learn them!)
Beyond the posters for the wall or whiteboard, I have also made a one-page list for each grade level, and cards that can be cut out and put on a ring for each student to keep in their desks. If you would like to see these, please check them out in my Teachers Pay Teachers store Light Bulbs and Laughter.
In conclusion, I have a question for you! I believe that every math lesson will include a few of these practices. Maybe there are lessons that include them all. (Not introductory lessons, but the regular, every day kind.) I have been told in math training that Number Talks are the only type of lessons that include every one of these. Do you agree? Have you ever used every one of these practices when teaching a lesson?
Happy Math Teaching,
Why I Love Common Core Math - Eight Standards for Mathematical Practice, Part 1

Well, here's what I have to say about Common Core Math. Regardless of what grade you teach, from K-12, and regardless of the particular math standard that you are teaching at a given time, the Common Core has given us eight Mathematical Practice Standards that are awesome. Yep. I said awesome. Here's why. They're like sunglasses.
You put them on, and you look at a standard in a different way. Your perspective changes, and you see it in a whole new light (dark?). And when you look at anything in EIGHT different ways, well, you're bound to understand it better.
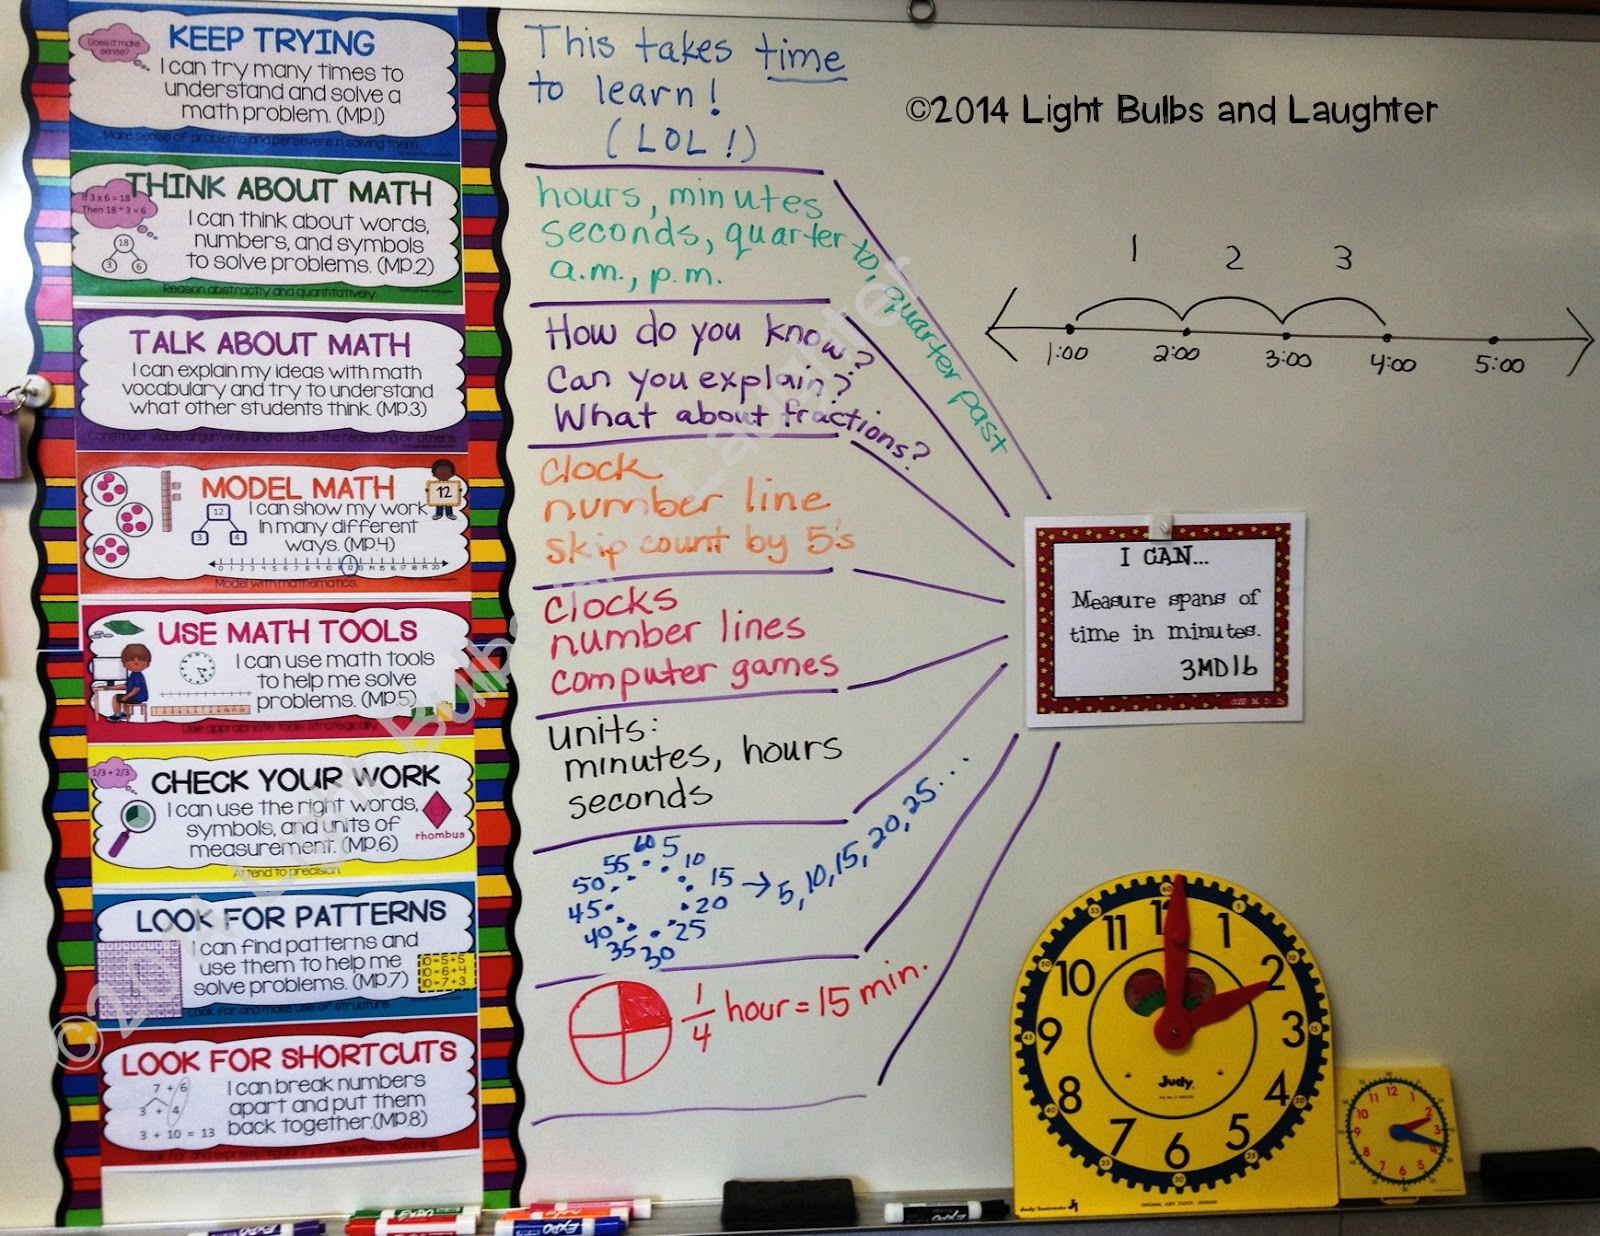
Let's look at the photo above. I was introducing the standard of measuring time in minutes to my third graders. They had already learned about telling time to the hour and half hour in first grade, and to five minutes in second grade, so it was definitely not a new concept for these students.
So we began looking at the standard through our special "lenses":
MP1: Keep Trying. We asked ourselves, "What does it mean to keep trying?" One of my sweeties pointed out that it takes TIME to learn something new (I know, right? Pretty good sense of humor for an eight-year-old.) So that's what we wrote down.
MP2: Think About Math. "What are the words, numbers, and symbols we think about with this standard?" The students came up with these: hours, minutes, seconds, a.m., p.m., quarter to, and quarter past.
MP3: Talk About Math. "What do we say to each other when we talk about this standard?" The students said that they would ask, "How do you know?", "Can you explain that?". The question, "What about fractions?" was added later, after discussing MP8.
MP4: Model Math. "What do we use to model this standard?" The answers were a clock, a number line, and skip counting by fives.
MP5: Use Math Tools. "What tools would we use to solve problems with this standard?" The answers were clocks (I had the student get them and put them on the white board tray), number lines (the student told me how to draw one), and computer games.
MP6: Check Your Work. This means, "Are we using the right words, symbols, and units of measurement?" The students pointed out that the units of measurement for this standard would be minutes, hours, and seconds.
MP7: Look for Patterns. "What patterns can we find to help us solve problems?" The students immediately pointed out the pattern of counting by fives. They wanted the pattern to go in a circle, like the clock, but said that it could also be written out on a number line.
MP8: Look for Shortcuts. The question for this one is, "How can we break things apart and put them back together?" I didn't know what I was going to get on this one! First, a student said that you could break the clock in half, and that would be 30 minutes. Then another student said that you could break the half a clock in half again. I drew that on the whiteboard and asked what it looked like to them, and one student said, "fractions!" So we talked about how one-fourth of an hour would be 15 minutes.
And there you have it. In less than thirty minutes, we had a collaborative introduction to a standard that was very thorough, activated our background knowledge, and that we could refer back to (and add to) as we progressed through the unit. Plus, it was a lot more fun than a written assessment!
I'm sure you noticed that these Eight Standards for Mathematical Practice have been modified. I felt that the original wording was too difficult for young children to understand, and that my time was better spent teaching the math, instead of teaching them the meaning of words like "precision" and "abstractly" and "quantitatively".
I'll tell you more about the modification process, and about how we use them at our K-8 school in my next post!
UPDATE #1: I've been asked to place the links to my products on TeachersPayTeachers on this post. Before I do, I want to say that you don't NEED a particular set to do this type of introductory lesson! There are free sets out there, or you can make your own. That being said, here are the links to purchase mine (and of course I would be thrilled if you do!).
Kindergarten 8MPS
Grades 1-2 8MPS
Grades 3-5 8MPS
Grades 6-8 8MPS (These are more "grown up" - original wording, no clipart, no cards.)
Remember to print them ledger size to fit perfectly on a white board!!
UPDATE #2: The magnetic strips that I used on the whiteboard to hold the standards up... I bought them at a local teacher store. They are available (as well as lots of other cute styles) on Amazon HERE.
Happy Teaching,
How To Make Your Binders Beautiful - For Free
It's time to make our binders beautiful, people! This pink and black polka-dot set is my first one, and it is free on Teachers Pay Teachers. You can get it at my store, appropriately called... Light Bulbs and Laughter. Yep. You will need to have PowerPoint to open the file. Here is what you will see:
This cover page. These pink and black covers are for my dear teacher friend Yolie. She is a fierce and feisty defender and teacher of children, and she loves pink and black (and Betty Boop, but that's another story).
(Click on any picture to
Page 7
The second spine page is for binders that have a 1 3/4 inch wide spine.
Page 8
The third spine page is for binders with a 1 1/2ish spine.
Page 9
I know, this is getting boring. Hang in there just a little longer!
This fourth spine page is for one inch binders. It measures 7/8 of an inch wide.
Page 10
This is for those tiny little half inch binders. They don't hold enough to be worth much. But I have a few.
Page 11
This guy is for the BACK of your binder. I know. Most people wouldn't even think of putting a back on. But someone requested it, and it does make
the binder look really professional...
You can also use it to make a different spine or cover. Just add your own black
shape and type away!
Whew. If you made it all the way to the bottom of this post, you deserve a prize. So go and download these binder covers. If pink and black are not your thing, I have some others on their way to TpT very soon. Remember to leave feedback, and follow my store for more polka-dot happiness, and other stuff, too.
Binders Should Be Beautiful
Remember that old commercial that ended with "...and I'm worth it"? It was for hair color, if I remember correctly. Well, sometimes teachers need to remember that line. We do everything with our students in mind. We plan, learn, teach, reteach, test, grade, counsel, and guide. We give up our lunch hours for intervention, stay late for tutoring, and spend hours learning to use technology. I could go on and on.But how often do we do something for ourselves? Just because it makes us smile? I've decided to do that now. My eyes have been opened to how truly ugly my binders are. I have measured the binders I have (See my last post.) I have thrown out the ones that are broken and majorly icky. Now it's time to begin the beautification process. Yay!
Remember this picture? This is only a sample of what I am working on! I am a woman on a mission.
I have resigned myself to the fact that binders are no uniform sizes, and I cannot afford to buy all new ones (have you seen how much they cost?!?)
These are the spine width sizes I need to make them work:- half inch
- one inch
- one-and-a-half inch
- one-and-three-quarter inch
- two inch and larger, depending on how you cut them
Here are some examples of the front covers. I scoured the internet (especially Teachers Pay Teachers) for cute background papers and clip art, to give my teaching friends some stuff to choose from. Since we are using Engage New York Curriculum for math, we focused on binders for all of the reams and reams of paper we have been printing! Now, these make me smile =)
Then we put one in a two-inch binder cover. And this is what we saw:
The page didn't even come close to filling up the front cover!!
So I made a few adjustments to my file, and now we had strips of the same paper to fill up the binder cover. It doesn't always match perfectly, but it blends, and it takes away the white borders. You can cover the white lines that are on the edge of the cover page (as in the picture above), or you can let them show (as in the blue binder picture to the left).
Here's the secret... you print only one spine on a page, leaving the rest to be used for the borders! (The only negative I see is the use of extra ink, but in our case we felt it was worth it.)
And there you have it. Beautiful binders that are filled to the edges, and five sizes of spines to choose from. Next time I'll tell you how to get a set for free. Because sometimes teachers need a reason to smile.
Subscribe to:
Posts (Atom)